Célszoftver a zavartalan istentiszteletért
Ahol a technika valódi segítség, nem pedig figyelemelterelő teher.
Ezt a programot a mindennapi lelkészi gyakorlat hívta életre. Kisebb gyülekezetekben – kántor és technikus hiányában – a hangosítás és az online közvetítés terhe gyakran egyedül az igehirdetőre hárul. A Liturgia Rendszer célja, hogy ezt a feladatot a háttérbe szorítsa: úgy irányíthatod a technikát, hogy közben a figyelmed száz százalékban a szolgálaton maradhat. A végeredmény pedig egy zavartalan, méltó istentisztelet mind a templompadokban ülő, mind a képernyők előtt lévő hívek számára.
Bár a rendszer úgy lett megtervezve, hogy a lelkész technikai személyzet nélkül, egyedül is képes legyen levezetni a teljes istentiszteletet, egy segítő bevonásával ez a teher teljesen levehető a válláról: ilyenkor a programot egy munkatárs kezeli a háttérből, míg a lelkész – egy felé irányított külső kamera és mikrofon segítségével – minden technikai feladattól mentesülve, zavartalanul és kizárólag a szolgálatra fókuszálhat.
A program használata igen egyszerű. Töltsd le az ingyenes alapverziót, csomagold ki, és a Liturgia mappát tedd bárhova a gépeden, ahol kényelmesen használni tudod (Windows és Mac rendszereken szabadon áthelyezheted, Chromebookon viszont érdemes a beállításoknál megadott főkönyvtárban hagyni).
A program felülete kétnyelvű (magyar és angol), de ami a legfontosabb: maga a rendszer teljesen nyelv- és felekezetfüggetlen! Bármely nyelven, bármely felekezet feltöltheti a saját tartalmával. (A belső mappák és indítófájlok a technikai stabilitás érdekében angol elnevezésűek, a program neve, a "Liturgia" pedig egy nemzetközileg ismert kifejezés, így ezt nem fordítjuk).
Bár a letöltött csomag jelenleg a Magyar Református énekeskönyvek (E96, MRE21) énekeivel és kíséreteivel van részlegesen feltöltve, ezt mindenki könnyedén testreszabhatja a saját liturgiai és gyülekezeti igényei szerint.
A saját tartalmaid beállításához (a Kézikönyv 4. és 5. pontja alapján) a következőket kell tenned:
- Az énekeskönyvek kódjait (az E96 és MRE21 oszlopneveket) pillanatok alatt átírhatod a sajátodra a program mappájában található
config.jsfájlban. - A
htmlmappában lévő változó liturgiai elemeket (pl. textus, hirdetések) szabadon átnevezheted a saját nyelvednek megfelelő fájlnevekre, sőt, újakat is hozhatsz létre. Csupán arra kell figyelned, hogy az Excel-fájl "H" oszlopában a hivatkozás pontosan megegyezzen az új fájlnévvel.
index.html fájl megnyitásával indul! A különböző operációs rendszerekhez tartozó helyes indítási módokról a Kézikönyv 8. Rendszer Indítási Útmutató pontjában találsz pontos leírást.
Purpose-Built Software for Seamless Services
Where technology is a real help, not a distracting burden.
This program was born out of everyday pastoral practice. In smaller congregations – lacking a cantor or technician – the burden of managing audio and online broadcasting often falls solely on the preacher. The goal of the Liturgia System is to push these tasks into the background: you can control the technology while keeping your attention entirely on your service. The result is a seamless, dignified worship experience for both the congregation in the pews and those joining from their screens.
Although the system is designed so that the pastor can conduct the entire service alone without technical staff, by involving a helper, this burden can be completely lifted from their shoulders: in this case, the program is operated by a coworker from the background, while the pastor – using an external camera and microphone directed at them – is freed from all technical tasks and can focus solely and uninterruptedly on the service.
Using the program is very simple. Download the free basic version, unzip it, and place the Liturgia folder anywhere on your computer where it is convenient for you (on Windows and Mac you can move it anywhere freely, but on Chromebook, it is recommended to leave it in the main directory specified during setup).
The program interface is bilingual (Hungarian and English), but most importantly: the system is actually completely language and denomination independent! Any denomination, in any language, can fill it with their own content. (For technical stability, internal folders and startup files are consistently named in English, and the program's name, "Liturgia," is an internationally recognized term, so we keep it untranslated).
Although the downloaded package is currently partially filled with songs and accompaniments from the Hungarian Reformed hymnals (E96, MRE21), anyone can easily customize this to their own liturgical and congregational needs.
To set up your own content (based on points 4 and 5 of the Manual), you only need to do the following:
- You can easily change the hymnal codes (the E96 and MRE21 column names) to your own in the
config.jsfile located in the program folder. - You can freely rename the variable liturgical elements in the
htmlfolder (e.g., scripture, announcements) to match your own language, and even create new ones. You just need to ensure that the reference in column "H" of the Excel file exactly matches the new file name.
index.html file! For the correct startup methods corresponding to different operating systems, please refer to section 8. System Startup Guide in the Manual.
Liturgia Rendszer – Kézikönyv
Kattints az alábbi pontokra a részletek megnyitásához!
1. A Vezérlő oldal
A program indulása után a Vezérlő (Controller) oldal jelenik meg. Itt végezheted el az istentisztelet előtti alapbeállításokat:
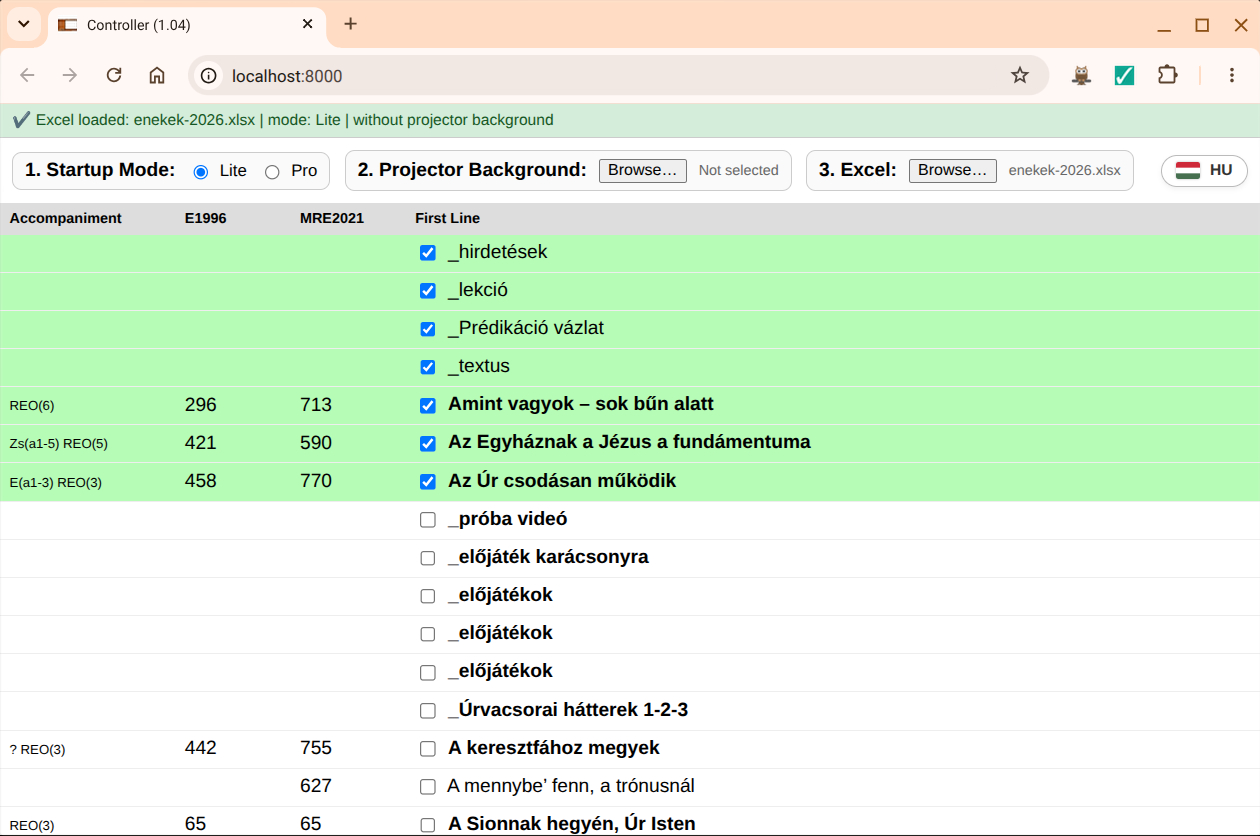
- Kiválaszthatod az "Induló mód"-ot (Lite vagy Pro).
- Kiválaszthatsz egy hátteret a
display-bgmappából, amely a vetítővászon hátterét biztosítja. (Ezt később is módosíthatod). - Töltsd be a program tartalmát biztosító Excel-fájlt.
A tartalom áttekintése és rendezése:
A betöltés után egy négyoszlopos táblázat jelenik meg:
- Előadó: Tájékozódást biztosító megjegyzések, kódok.
- Pl.:
REO(3)= Református Énekek Orgonakísérettel (3 versszak). Zs(a1-5)= Énekel a Zsinat (a teljes ének egyben).Zs(1,3,5)= Énekel a Zsinat (konkrét felénekelt versszakok).
- Pl.:
- E96: Az Erdélyi Énekeskönyv (MRETZS 1996) számai.
- MRE21: Az új Magyar Református Énekeskönyv (MRE 2021) számai.
- Ének kezdősora: Az adott ének első sora.
Bármelyik oszlop szerint rendezheted a megjelenítést a fejlécre kattintva.
- Vastag betű: Ahol az ének vastag betűkkel jelenik meg, ott van hozzá énekkíséret (hivatkozott audiófájl, az Excel E, F, G oszlopaiban).
- Jelölőnégyzetek (Checkboxok): Az ének kezdősor előtt található egy jelölőnégyzet. Ez arra szolgál, hogy az istentisztelet előtt kiválaszthatod a megfelelő liturgiai elemeket (énekek, textus, hirdetések). A kiválasztott elemek a sorrend elejére kerülnek, egy blokkba, így istentisztelet közben már nem kell keresgélned őket.
2. A Display ablakok
A kiválasztott „Induló módnak” megfelelően a Lite vagy a Pro Display ablak nyílik meg. Mindkét verzióban egy vetítővászon részen jelenik meg az ének szövege, alatta pedig max. 3 audió lejátszó sáv található. Egyszerre csak egyet indíts el!
A Display Lite verzió
Ez a Liturgia Rendszer használatának legegyszerűbb módja, amely egy teljesen letisztult megjelenítést biztosít. Gyakorlatilag ezt a Display ablakot kell megosztanod a Google Meet-ben (vagy bármely más videókonferencia-programban, például Zoom-ban, MS Teams-ben vagy Webex-ben – bár a kézikönyvben a továbbiakban a Google Meet-et fogjuk példaként használni, mivel a szolgáltatásokat és árakat összevetve ez bizonyult a legideálisabb választásnak).
Ha a közvetítések során eddig a teljes képernyődet osztottad meg, mostantól elegendő csupán ezt az egyetlen ablakot kiválasztanod. A Vezérlőből (Controllerből) kiválasztott énekszöveg vagy bármilyen egyéb tartalom ezen a felületen keresztül (a lejátszott zenei kísérettel együtt) fog kimenni az online hallgatóságod felé. Fontos, hogy a saját kamerádat és mikrofonodat továbbra is a konferenciaprogramban kezeled a megszokott módon. Mindezzel párhuzamosan a tartalom a helyi gyülekezet projektorára is kiküldhető (de a lokális vetítésről egy kicsit később lesz szó).
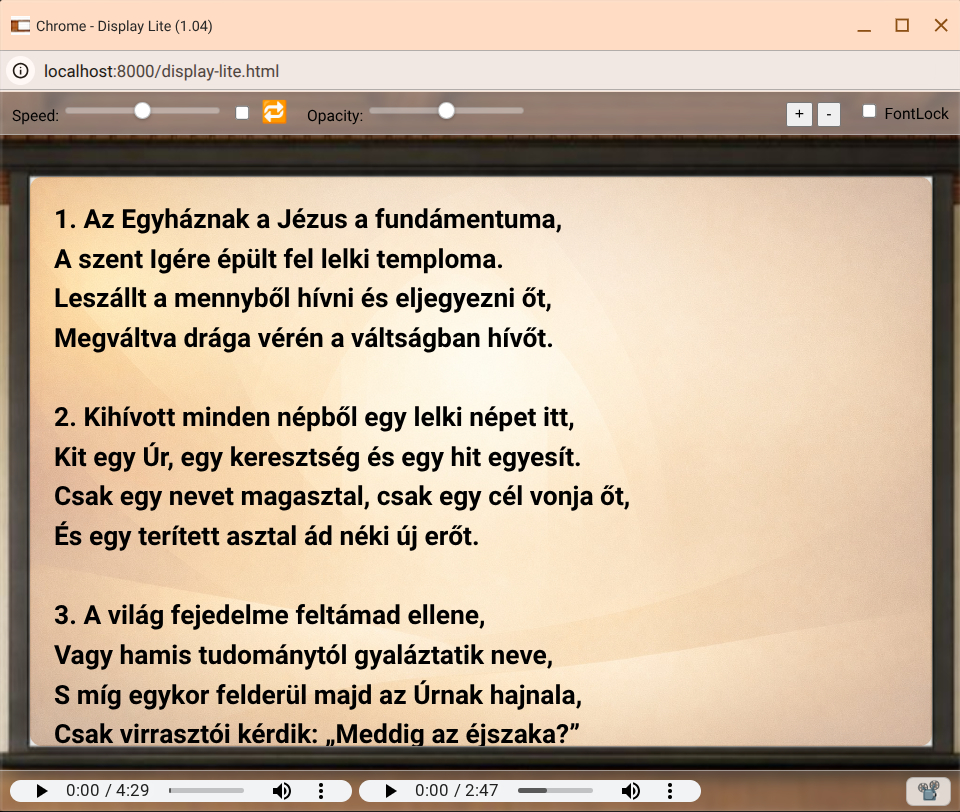
A vetítővászon felett a következő vezérlőket találod:
- Sebesség: A lejátszás sebességét +/- 15%-kal változtathatod.
- Loop (végtelenítés): (pl. gyülekezéskor). A következő ének kiválasztásakor automatikusan kikapcsol.
- Opacity: A háttérkép áttetszőségét állíthatod be vele.
- Betűméret (+/-) és FontLock: Állíthatod a betűméretet, a FontLock jelölőnégyzettel pedig ezt a beállítást megőrizheted a következő énekekre is.
A Display Pro verzió (A "Mini OBS stúdió")
A Pro ablak jóval komplexebb. Gyakorlatilag a Google Meet-ben mind a kamerát, mind a mikrofont ki kell kapcsolnod, ugyanis ez az ablak, mint egy mini OBS stúdió (hasonlóan a népszerű OBS Studio közvetítő szoftverhez), kezel mindent! Itt egy teljes "templombelsőt" felépíthetsz.
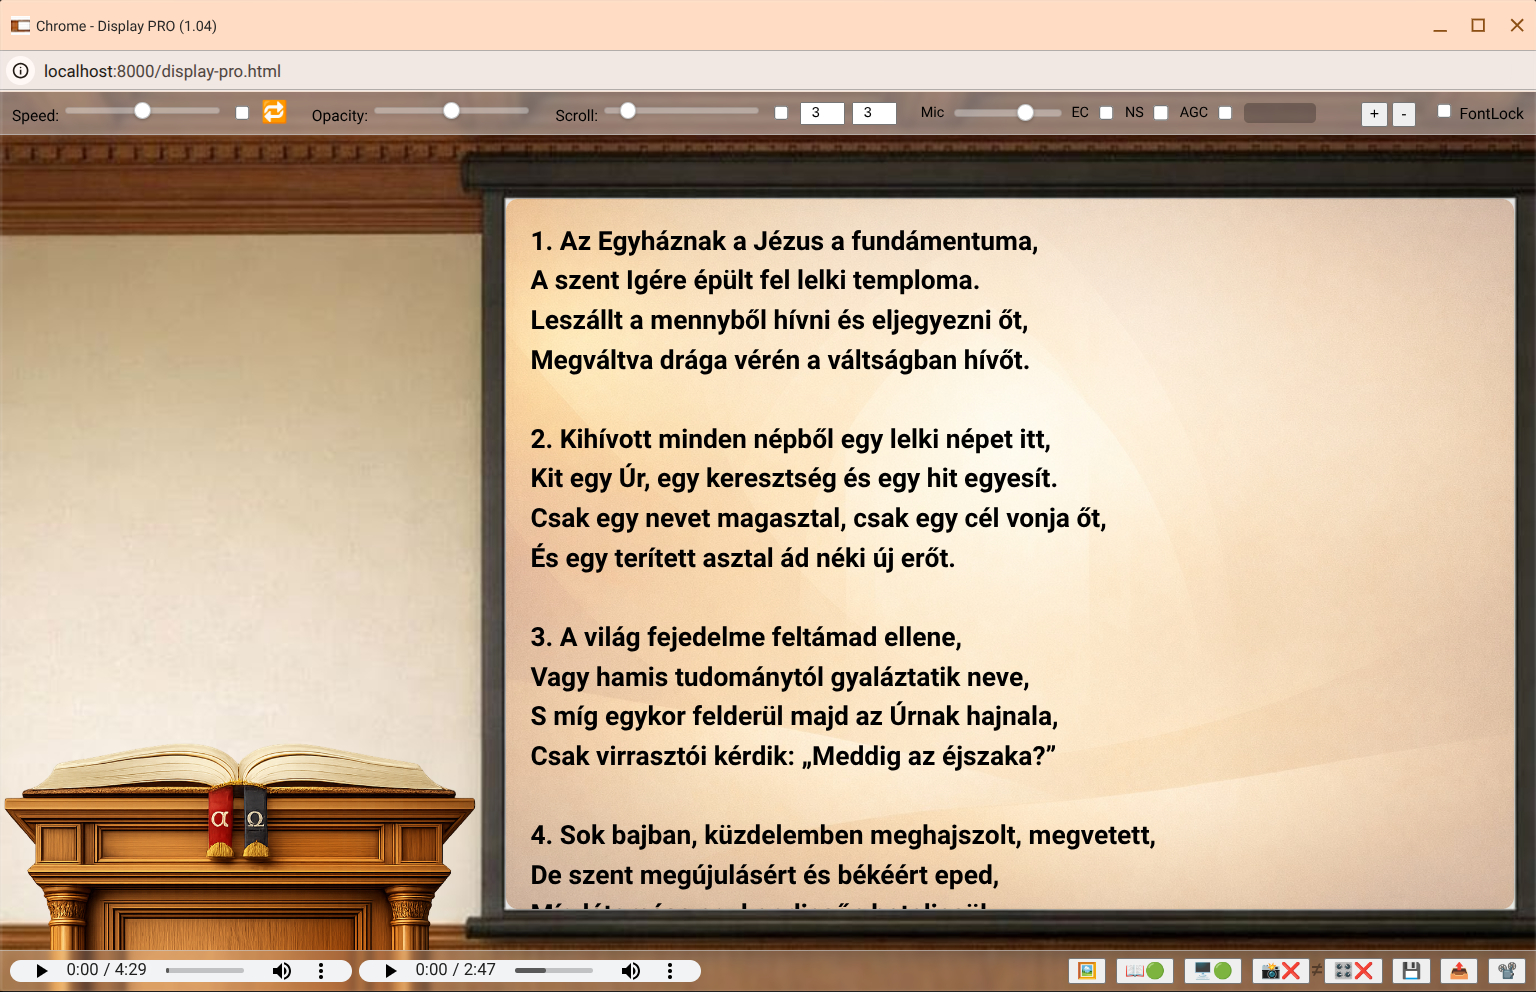
Vess egy pillantást a PRO modulra! Építsd fel a saját templombelsődet egyedi képekkel.
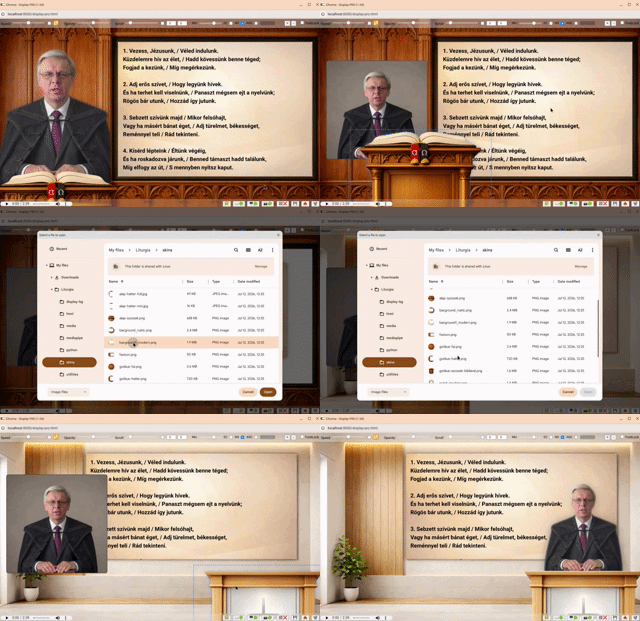
A Pro verzió többletfunkciói:
- Felső vezérlők (Scroll és Audió):
- Scroll (Görgetés): Hosszabb, képernyőre nem férő szövegek (pl. gyülekezési információk) automatikus görgetésére. Hogyan kell használni? A jelölőnégyzettel (checkbox) kapcsolod be. A csúszkával a sebességet, a két számmezővel pedig az indulás előtti és az újrakezdés előtti várakozási időt (másodpercben) állíthatod be.
- Audió és Mikrofon beállítások (VU indikátor): EC (Echo Canceling), NS (Noise Suppressant) és AGC (Auto Gain Control) kapcsolók. Hogyan kell használni? Külső mixerből származó tiszta zene bejátszásakor ezeket KI KELL KAPCSOLNOD, különben a rendszer eltorzítja a zenét. Ha kizárólag a laptop mikrofonját használod beszédre, érdemes az NS-t és EC-t bekapcsolnod.
- Alsó ikonsor és Layerek (Rétegek):

- Háttérkép megváltoztatása (a
skinsmappából). - Szószék és Screen (vászon) ki/be kapcsolása.
- Kamera betöltése (első betöltéskor a böngészőben engedélyezned kell). Ugyanez az ikon tiltja vagy engedélyezi is a kamerát.
- Mixer (hangforrás) betöltése. (Első betöltéskor a böngészőben engedélyezned kell). Ugyanez az ikon tiltja vagy engedélyezi is a hangforrást. (A kamera és a hangforrás között van egy kapcsoló, amely összezárja a két forrást és együtt kapcsolható a mikrofon és a kamera).
- Mentés (Save settings) és Visszatöltés (Load settings).
- Háttérkép megváltoztatása (a
- Interaktivitás és Kamera effektek (Cutout):
- Gyakorlatilag a háttér és a szószék "közé" tudsz beállni. A szószékre jobb gombbal kattintva kicserélheted a szószéket, bal gombbal pedig mozgathatod, méretezheted. (Ugyanígy a vetítővászon szövegdobozát is formázhatod a sarkainál fogva).
- A kameraképre jobb gombbal kattintva effekteket hívhatsz be. A legfontosabb a cutout hatás, amely eltávolítja a kamera hátterét, és csupán a portrédat illeszti be a megszerkesztett templombelsőbe.
skins könyvtár)
A mentés (6. gomb) valójában egy "letöltés" a böngésző biztonsági szabályai miatt! A mentett .json beállítási fájl a számítógép Letöltések (Downloads) könyvtárába fog kerülni. Ezt a fájlt manuálisan kell átmozgatnod a Liturgia mappa alatti skins könyvtárba a későbbi visszatöltéshez!
3. Képernyők elrendezése és Kivetítés az istentisztelet alatt
A programot úgy helyezd el, hogy a Vezérlő és a Display ablak kényelmesen látható legyen a számodra.
- Online közvetítés (Google Meet): A Meet-ben a Display ablak TAB-ját oszd meg, ügyelve arra, hogy a "Hang megosztása" funkció be legyen kapcsolva!
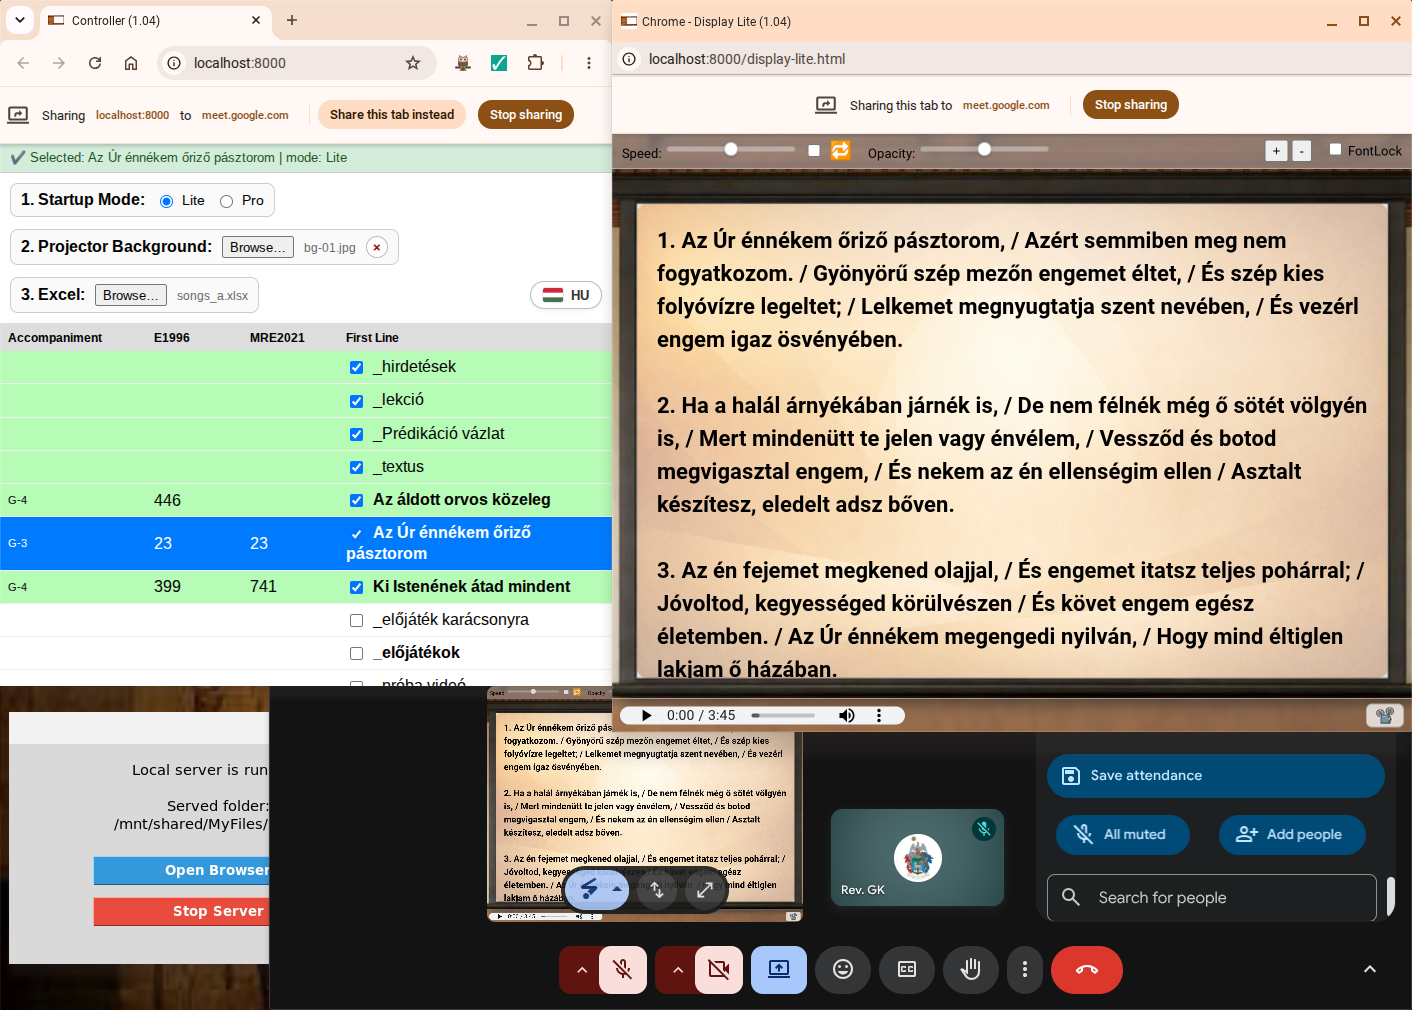
- Helyi projektoros vetítés (vetítő ikon): Mind a Lite, mind a Pro Display ablak jobb alsó sarkában találsz egy kis vetítő ikont. Erre kattintva felugrik egy vezérlőgombok nélküli ablak, amely kizárólag a vetítővászon (a szöveg) tartalmát mutatja, tökéletes szinkronban. Ezt húzhatod át a 2. monitorra (HDMI), vagy ChromeCast-tal vezeték nélkül átküldheted a projektorra. (Fontos: Ez az ablak szándékosan nem méretezhető szabadon a szinkronizált tartalom miatt. A Chromecast automatikusan kitölti a képet, HDMI esetén a projektor nagyítását javasolt használnod).
A válasz egyszerű, de két oka is van:
- Ha a fő Display ablakot osztanád meg Chromecasttal, vagy közvetlenül azt húznád át egy HDMI-s projektorra, az operációs rendszer automatikusan átirányítaná („lelopná”) a hangot a külső eszközre. Emiatt a számítógép elnémulna, a helyi lejátszás megszűnne, és a Google Meet felé sem menne ki a hang. A különálló vetítőablak szándékosan „néma” (nem tartalmaz hanglejátszót). Ha ezt osztod meg, a hang biztonságban a fő Display ablakon marad.
- A lokális kivetítővásznon amúgy sem lenne elegáns a Vezérlő gombjainak és lejátszóinak megjelenítése a gyülekezet felé.
4. A program „szíve”: Az Excel-fájl szerkesztése és testreszabása
A Liturgia Rendszer tartalmi gerincét a program mappájában található Excel-táblázat adja. Ez a fájl nem egy zárt rendszer; arra lett tervezve, hogy a helyi gyülekezet igényei szerint szabadon szerkeszthesd és bővíthesd.
A táblázat felépítése (Mit hova kell írni?):
A 9 oszlop (A-I) sorrendje szigorúan kötött, a program ez alapján keresi meg az információkat.
- Oszlop (A) – Előadó / Megjegyzés: Ez az oszlop kizárólag a saját tájékozódásodat szolgálja, a program működését nem befolyásolja. Ide írhatod be, hogy kinek a feldolgozása, és hány versszakból áll a feljátszott hangfájl.
- Oszlop (B) és (C) – E96 és MRE21: Az 1996-os Erdélyi, illetve a 2021-es új Magyar Református Énekeskönyv számai. A számok beírása segíti a Vezérlőben történő gyors, fejléc szerinti sorba rendezést. (Nem kötelező kitöltened).
- Oszlop (D) – Ének kezdősora / Cím: Ez a legfontosabb azonosító, ami a Vezérlő listájában megjelenik.
- Vastag betűs kiemelés: Ahol a program érzékeli, hogy az énekhez tartozik lejátszható audiófájl, ott a címet a Vezérlő automatikusan vastag betűvel emeli ki.
- Az aláhúzás (_) trükk: Az aláhúzás jellel kezdődő sorok (pl.
_hirdetések,_textus) a betűrendes rendezésnél egy csoportba, a lista legtetejére kerülnek. Így az állandó liturgiai elemek nem keverednek el az énekek között.
- Oszlop (E, F, G) – Audió fájlok (1-3. lejátszó): Ide kerülnek a lejátszandó hangfájlok pontos nevei kiterjesztéssel együtt (pl.
enek01.mp3). Ezeket a fájlokat másold be amediamappába!- Támogatott audió formátumok:
.mp3,.wav,.ogg,.m4a. - Ha mind a három oszlop ki van töltve egy éneknél, akkor a Display ablakban 3 külön lejátszó sáv fog megjelenni egymás mellett (pl. 1 versszak, 2 versszak, teljes ének).
- Támogatott audió formátumok:
- Oszlop (H) – Egyedi háttér, Videó vagy HTML (Külső hivatkozás): Ez a rendszer legokosabb oszlopa, amely a
mediavagyhtmlmappában lévő fájlokat hívja be.- Egyedi háttérkép (
.jpg,.png,.webp): Ha ide bekerül egy képnév (pl.zaszlo.jpg), akkor az adott éneknél ez a kép felülírja a Vezérlő indulásakor beállított globális projektor hátteret! Ez kiváló megoldás például a Himnusz alatt a magyar zászló egyedi kép megjelenítésére. - Videó lejátszása (
.mp4,.webm): Videófájl megadása esetén a szöveg helyett a videó jelenik meg és indíthatod el a kivetítőn. - HTML-fájlok (pl.
textus.html): A hétről hétre változó, dinamikusan betöltődő külső szövegek (lásd az 5. fejezetet).
- Egyedi háttérkép (
- Oszlop (I) – Az ének szövege: Itt található a kivetítendő ének nyers szövege.
Az Excel-cellában a teljes énekszövegnek szigorúan egyetlen folyamatos sorként kell szerepelnie! A hagyományos sortörés (Enter vagy Alt+Enter) használata tilos, mert szétesik a táblázat szerkezete, és a program hibára fut.
A versszakokat a \n kóddal kell elválasztani, de nem kell ezzel kézzel bajlódnod! Pontosan erre a célra építettük be a Mini-Editor segédprogramot (lásd a 6. fejezetet). Csak másold be a normálisan, sortörésekkel megírt éneket az editorba, és az egy gombnyomással átalakítja neked egy másolható (copy/paste), Excel-barát, egysoros formátumba. Új ének felvitelekor mindig ezt a módszert használd!
5. A külső HTML-fájlok varázsa (Textus, Lekció, Prédikáció, Hirdetések)
Az Excel soraiban megfigyelheted, hogy a "H" oszlopban olyan fájlnevek is vannak, mint textus.html, lekcio.html vagy hirdetesek.html.
Az istentiszteletek ezen elemei hétről hétre megváltoznak. Nagyon hibaérzékeny lenne ezeket a hosszú, tördelést igénylő szövegeket minden héten az Excel apró celláiba belezsúfolni. Ehelyett a program egy elegáns megoldást használ: külső HTML-fájlokra hivatkozik, amelyek a html mappában vannak.
Hogyan működik ez a gyakorlatban?
- A vasárnapi szolgálatra való felkészülés során nem szükséges megnyitnod az Excelt.
- Csak nyisd meg pl. a
textus.htmlfájlt egy szerkesztővel (ajánlott a Mini-Editort használni), írd vagy másold be a megfelelő szöveget, szükség szerint formázd, az Előnézet (Preview) megnyomásával ellenőrizd a szerkesztett oldalt, majd mentsd el.
(tipp: a https://abibliamindenkie.hu/ oldalról nagyon könnyű a copy/paste megoldással beilleszteni mind a lekció-, mind a textus szövegszakaszokat) - Amikor az istentiszteleten a Vezérlőben kiválasztod pl. a "_textus" sort, a program a "H" oszlopban hivatkozott frissen megszerkesztett "textus.html" fájl tartalmát jeleníti meg a Display vetítővásznán!
Így a liturgiai váz (az Excel) stabil marad, míg a heti változó tartalmakat az istentisztelet előtt villámgyorsan szerkesztheted.
6. A Mini-Editor használata
A rendszer utilities (segédprogramok) mappájában találod a mini_editor.html fájlt. A használathoz nem szükséges elindítanod a Liturgia Rendszert, dupla kattintással megnyithatod a böngészőben. A felső sávban két üzemmód közül választhatsz:
1. ÜZEMMÓD: „Szöveg -> \n konverter” (Énekekhez)
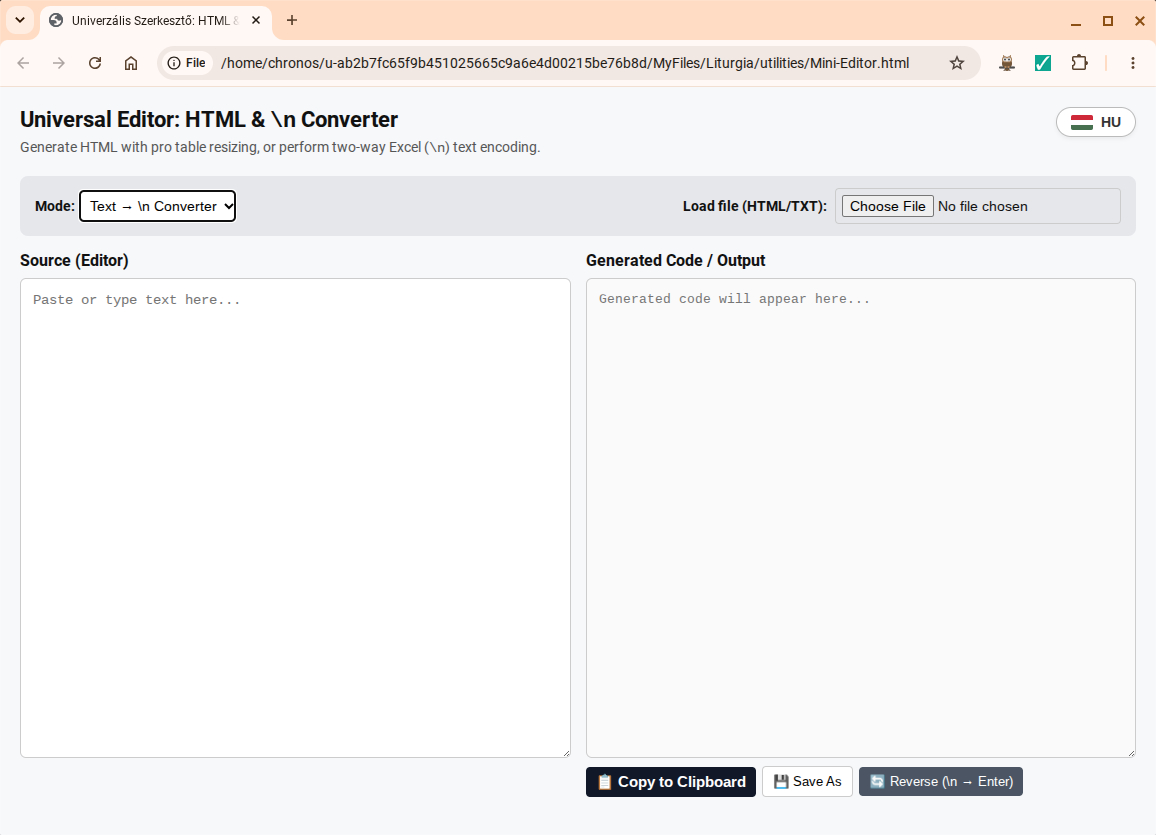
Ezt az üzemmódot akkor érdemes használnod, ha egy új éneket akarsz felvenni az Excel "I" oszlopába.
- A bal oldali szövegdobozba egyszerűen másold be az ének versszakait a normál sortörésekkel. (lásd:
https://enekeskonyv.reformatus.hu/digitalis-reformatus-enekeskonyv/) - A jobb oldali dobozban automatikusan, valós időben generálódik az egysoros,
\njelekkel teletűzdelt formátum. - A Kód másolása (Copy to Clipboard) gombra kattintva, - a vágólap segítségével - beillesztheted (Paste) a szöveget az Excel-cellába.
2. ÜZEMMÓD: „HTML szerkesztő” (Textus, Prédikáció, Hirdetések)
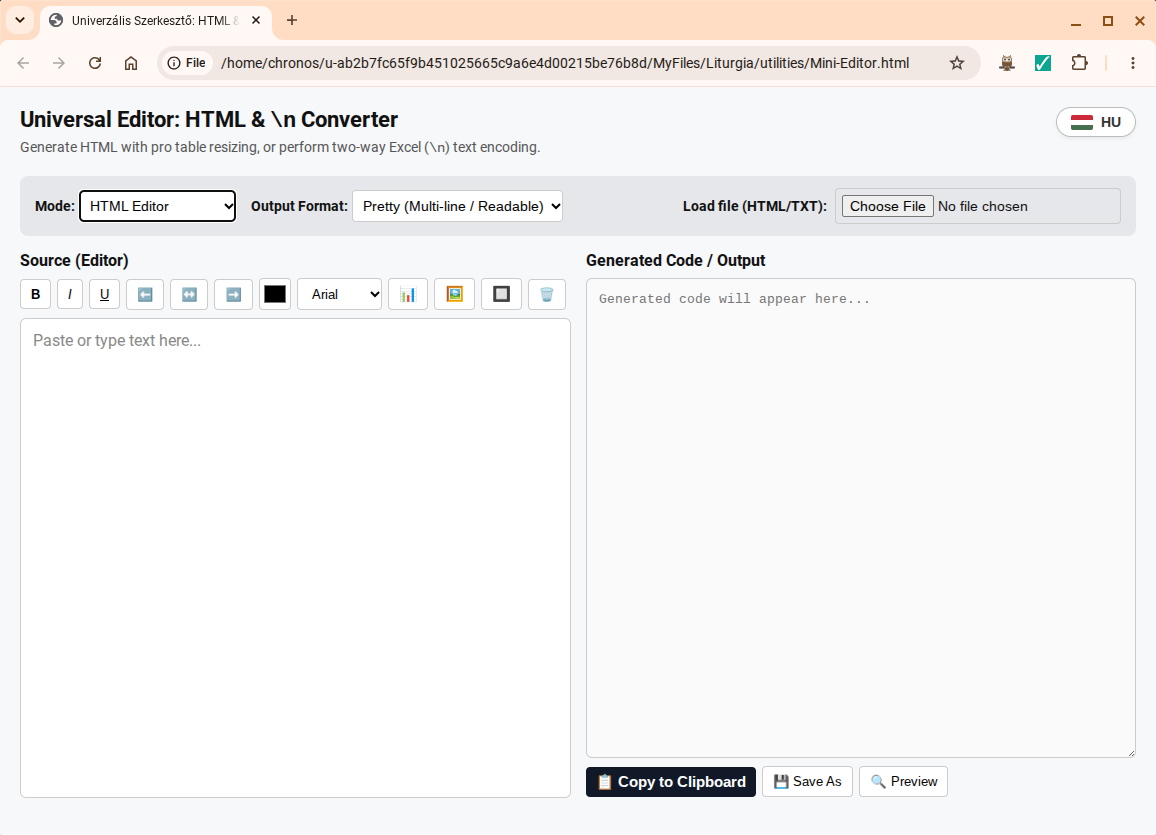
A vasárnapi változó elemek heti frissítésére való.
Gyakorlati tanács: Ne használd a Word-öt és a LibreOffice-t! Ezek az irodai programok telepakolják a fájlt láthatatlan "szemét" kódokkal, ami a kijelzőn szétcsúszott megjelenést okoz. Használd helyette a Mini-Editor beépített vizuális szerkesztőjét!
- A bal oldali szövegdoboz átalakul egy vizuális szövegszerkesztővé (mint egy mini Word).
- Lehetőséged van vastag-, dőlt-, aláhúzott formázásra, jobbra-, balra-, középre igazításra, betűszínek és betűtípusok kiválasztására, illetve táblázatokat és képeket is beszúrhatsz. (A betűk méretét itt értelmetlen lenne meghatároznod, mert azt a Liturgia program maga kezeli).
- A program a háttérben ebből egy tiszta, „szemétmentes” HTML-kódot generál a jobb oldali dobozban.
A böngésző nem tudja közvetlenül felülírni a gépen lévő fájlokat. Két módszer létezik:
- 1. módszer (Copy / Paste – A leggyorsabb és ajánlott): Kattints a „Kód másolása” gombra. Az eredeti fájlt (pl.
html/hirdetesek.html) nyisd meg egy gyári szövegszerkesztővel (Jegyzettömb, TextEdit). Töröld a múlt heti tartalmat, illeszd be az újat, majd mentsd el a fájlt. - 2. módszer (Letöltés és Átmozgatás): Kattints a „Mentés” gombra. A böngésző letölti az elkészült munkát a Letöltések (Downloads) mappába. Nevezd át a fájlt, és írd felül vele a régit a Liturgia rendszer
htmlmappájában.
7. A technikai háttér: Miért Google Meet és Lokális Szerver?
Miért a Google Meet?
Az online részvétel biztosítására a lehetőségek alapos mérlegelése után a Google Meet bizonyult a legmegfelelőbb platformnak. A YouTube, a Livestream és más nyílt videómegosztók használata egy kisebb gyülekezetnél - többek között - azért ütközik akadályokba, mert az élő hangszeres kíséretet pótló bejátszások gyakran áldozatául esnek az automatikus szerzőijog-szűrő algoritmusoknak. Még a teljesen jogtiszta kíséretek esetén is gyakori a téves azonosítás, ami a közvetítés azonnali némítását vagy letiltását eredményezheti, és ennek heti szintű adminisztratív rendezése pedig aránytalanul időigényes. A Google Meet mentes az ilyen jellegű szűrésektől, emellett zárt felületként sokkal hatékonyabban óvja az istentisztelet közösségi intimitását.
Az audió fájlok átvitele (énekkíséretek):
A fejlesztés során a zenei kíséretek tiszta hangátvitelének megoldása jelentette a legfőbb technikai feladatot. Mivel a konferenciaprogramok beépített zajszűrői a beszédhangra fókuszálnak, a zenét torzítják, kiszűrik. Azonban a böngésző ablakok megosztásán keresztül továbbított hanganyag torzításmentesen, kiváló minőségben jut el a hallgatósághoz. Éppen ezért a Liturgia program webes alapokon, böngészőben futó alkalmazásként készült el. Ez a technológiai döntés nemcsak a hangminőség problémáját oldotta meg, hanem biztosítja azt is, hogy a szoftver bármilyen eszközön és rendszeren használható legyen.
Miért localserver?
Bár kezdetben a program online, webszerveres üzemeltetése volt a cél, ez a megközelítés a gyakorlatban hamar komoly korlátokba ütközött. A nagy méretű hanganyagok akadásmentes lejátszása, továbbá a felhasználói beállítások rugalmas kezelése helyi (offline) megoldást igényelt. Azonban számos funkció (például a kameraeffektek vagy a HTML-tartalmak beágyazott megjelenítése) biztonsági okokból szerverkörnyezetet követel meg, tehát egy áthidaló technológiára volt szükség. Ezek az okok vezettek ahhoz a megoldáshoz, hogy a szoftver helyi kiszolgálóként, lokális szerver (localserver) üzemmódban működjön, így egyesítve a webes technológiák előnyeit a helyi adattárolás stabilitásával.
index.html fájlra kattintva a program elindul, mégsem fog megfelelően működni, mert a program számos eleme localserver üzemmódot igényel. Erre egyébként a böngésző felső sorában megjelenő sárga figyelmeztető sor is felhívja a figyelmet: "Figyelem: A program közvetlenül a számítógépről lett megnyitva (file mód). A böngésző biztonsági szabályai miatt a médiafájlok betöltése korlátozott lehet!" Mindig az alábbi (8. fejezetben található) indítófájlokat használd!
8. Rendszer Indítási Útmutató
A rendszer futtatásához nem lesz szükséged bonyolult beállításokra. Attól függően, hogy milyen számítógépet használsz (Windows, Mac, Chromebook vagy Linux), kövesd az alábbi néhány egyszerű lépést.
(Tipp: A Liturgia program elsősorban a Google Chrome böngészőre vagy ehhez a családhoz tartozó böngészőkre van optimalizálva. Ugyanakkor a Microsoft Edge-en is fut. A futtató fájlok elsősorban ezek jelenlétét keresik a gépen, így érdemes ezek valamelyikét telepítened.)
A) Használat Windows rendszeren
A Windows gépeken a használat rendkívül egyszerű, mivel a letöltött csomag már eleve tartalmazza a rendszer működéséhez szükséges önálló Python programot (python\python.exe). Így semmilyen további telepítésre nincs szükséged.
- Keresd meg a letöltött mappában a
start-win.batnevű fájlt. - Indítsd el dupla kattintással.
- Ekkor megnyílik egy fekete parancssor ablak, és a böngészőben automatikusan betöltődik a Liturgia Rendszer.
- FONTOS: Ezt a fekete ablakot az istentisztelet végéig NE ZÁRD BE, különben a rendszer leáll!
- Ha véget ért az istentisztelet, ebben a fekete ablakban a CTRL + C gombok lenyomásával állíthatod le a programot. Amikor megjelenik a képernyőn, hogy "A LITURGIA RENDSZER LEALLT", biztonságosan bezárhatod az ablakot.
B) Használat Mac (macOS) rendszeren
Apple számítógépeken a rendszer a start-mac-r1.command fájl segítségével indul, és a gép saját, beépített Python3 motorját használja.

Míg a régebbi Apple rendszerek gyárilag tartalmazták a Pythont, az újabb verziókból az Apple ezt már eltávolította. Tehát az újabb operációs rendszer esetében az első használat előtt telepítened kell a Pythont. Ez mindössze néhány percet vesz igénybe:
- Keresd fel a hivatalos python.org/downloads oldalt.
- Töltsd le a Mac-re javasolt legújabb Python 3 telepítőt.
- Indítsd el a letöltött fájlt, és a szokásos módon lépkedj végig a telepítőn (Folytatás/Continue).
- Különösen fontos lépés: A telepítés legvégén automatikusan meg fog nyílni egy mappa a Finderben. Ebben a mappában keress meg egy "Update Shell Profile.command" és egy "Install Certificates.command" nevű fájlt, és mindkettőre kattints rá duplán! Ezek egy pillanatra megnyitnak egy fekete ablakot, majd be is zárhatók. Ez a lépés kritikus ahhoz, hogy a Mac a jövőben felismerje a Liturgia programot.
Első lépés: Futtathatóvá tétel (csak legelső alkalommal):
Miután a Python telepítése sikeresen megtörtént, már csak egyetlen biztonsági lépés van hátra. Az Apple szigorú védelme miatt a start-mac-r1.command indítófájlt első alkalommal futtathatóvá kell tenned.
- Nyisd meg a Mac beépített Terminál alkalmazását.
- Írd be a Terminálba a következő parancsot, majd tégy utána egy szóközt (még ne nyomj Entert!):
chmod +x - Az egeret használva egyszerűen húzd be a
start-mac-r1.commandfájlt a Terminál ablakába. (Ez automatikusan beírja a fájl pontos elérési útját a szóköz után). - Az Enter megnyomásával a fájl futtathatóvá válik. A Terminált ezután bezárhatod.
Mivel a program az internetről lett letöltve, a Mac biztonsági rendszere (a Gatekeeper) a legelső indításkor blokkolni fogja azt. Ennek feloldása nagyon egyszerű:
- A szokásos dupla kattintás helyett legelső alkalommal kattints jobb gombbal a
start-mac-r1.commandfájlra. - A felugró menüből válaszd a Megnyitás (Open) lehetőséget.
- A megjelenő figyelmeztető ablakban most már ott lesz egy Megnyitás (Open) gomb is. Kattints erre, és a rendszer engedélyezi a futtatást.
A Mac megjegyzi ezt a kivételt, így a jövőben már a sima dupla kattintással is zökkenőmentesen fog indulni a program.
Rendszeres indítás (istentiszteletek előtt):
- Indítsd el dupla kattintással a
start-mac-r1.commandfájlt! - Megnyílik egy Terminál ablak, majd a böngészőben a Vezérlő.
- FONTOS: Ezt a Terminál ablakot az istentisztelet végéig NE ZÁRD BE!
- A leállításhoz itt is nyomd meg a CTRL + C gombokat a Terminál ablakban.
C) Használat Chromebookon (Chrome OS)
A Liturgia Rendszer tökéletesen működik a Chrome OS operációs rendszeren is. Ehhez azonban néhány lépést el kell végezned. A telepítés négy egyszerű fázisból áll:
1. Fázis: A "motor" bekapcsolása (Linux környezet telepítése)
- Kattints a képernyő jobb alsó sarkában az órára, majd a Fogaskerék (Beállítások) ikonra.
- A bal oldali menüben válaszd a ChromeOS névjegye (About ChromeOS) gombot, majd a Fejlesztők (Developers) menüpontot.
- A Linux fejlesztői környezet (Linux development environment) sornál kattints a mellette lévő Bekapcsolás (Turn on) gombra.
- A felugró ablakban kattints a Tovább (Next), majd a Telepítés (Install) gombra. (A beállításokat hagyhatod az alapértelmezett értékeken).
- A telepítés befejezése után felugrik egy fekete ablak (ez a Terminál). Ezt az ablakot egyelőre bezárhatod.
2. Fázis: A fájlok másolása és az engedélyek megadása
- Nyisd meg a Chromebook beépített Fájlok (Files) alkalmazását.
- A letöltött
Liturgianevű mappán jobb gombbal kattintva válaszd a Másolás lehetőséget. - A bal oldali sávban kattints a Saját fájlok (My files) menüpontra (a főkönyvtárba!). Az üres területen jobb gombbal kattintva válaszd a Beillesztés lehetőséget.
- KRITIKUS LÉPÉS: A másolás befejezése után kattints jobb gombbal magára a
Liturgiamappára, és a felugró menüből válaszd ki a "Megosztás a Linuxszal" (Share with Linux) lehetőséget. Enélkül a háttérben futó motor nem látja a fájlokat!
3. Fázis: Az automatikus telepítő elindítása
- Nyisd meg a Chromebook Alkalmazásindítóját (bal alsó sarok, "G" ikon).
- Nyisd meg a Terminál nevű programot, és kattints a pingvin fejre.
- Másold be pontosan (vagy gépeld be) az alábbi parancsot, ügyelve a kis- és nagybetűkre, majd nyomj Entert. (ez a parancs a Liturgia munkakönyvtárába fog vezetni téged):
cd /mnt/chromeos/shared/MyFiles/Liturgia - A tényleges telepítő elindításához írd be a következő parancsot, majd nyomj Entert:
bash install-chrome.sh
(A gép ekkor automatikusan letölti a szükséges python3, python3-tk, lsof csomagokat, generál egy lokális szervert, és létrehozza a Liturgia indító ikont az alkalmazások között). - Amikor a képernyőn megjelenik az
INSTALLATION COMPLETEfelirat, bezárhatod a fekete ablakot.
4. Fázis: Az utolsó simítás és a rendszeres indítás
A Linux-alkalmazások (Linux apps) mappában megjelent a Liturgia Server ikon. (Tipp: Jobb gombos kattintással válaszd a "Rögzítés a polcon (Pin to shelf)" lehetőséget).
- Először nyisd meg a fekete Terminál alkalmazást, majd kattints a pingvin fejre.
- Várd meg azt a 2-3 másodpercet, amíg a fekete ablakban megjelenik a zöld "Ready" szöveg és a prompt. (Ezzel "felébredt" a Linux). Ezt az ablakot ezután azonnal bezárhatod.
- Ezt követően elindíthatod a tálcán lévő Liturgia Server ikont.
- A felugró mappa kiválasztó ablakban navigálj a megfelelő Liturgia mappához (
/mnt/chromeos/shared/MyFiles/Liturgia), majd kattints az OK gombra.
A rendszer a háttérben elindítja a szervert, és automatikusan megnyitja a Vezérlőt (Controller) a böngészőben. A háttérben fut egy ablak is, mely a localserver állapotát jelzi. Ezzel nincs további teendőd, bár az alkalom után a „Stop Server” gombbal leállíthatod. (Figyelmeztetés: A sok bezárás és újranyitás miatt előfordulhat, hogy több Vezérlő fül is megnyílik. Figyelj rá, hogy csak egy legyen nyitva!)
D) Használat Linux operációs rendszereken
Linux rendszerekhez nem készült külön indítófájl, mivel a Python legtöszer eleve telepítve van, a környezetek pedig eltérőek. A futtatáshoz egyszerűen kövesd ezt a két lépést:
- Nyiss egy terminált a Liturgia program főkönyvtárában (ahol az
index.htmlfájl is található), és indítsd el a beépített helyi szervert az alábbi paranccsal:
python3 -m http.server 8000 - Nyiss meg egy Chromium-alapú böngészőt (pl. Google Chrome), és gépeld be a címsorba:
http://localhost:8000
Liturgia System – User Manual
Click on the sections below to open the details!
1. The Controller Page
After starting the program (see Section 8. System Startup Guide), the Controller page appears. Here you can make the basic pre-service settings:
- Select the "Startup mode" (Lite or Pro).
- Select a background from the
display-bgfolder, which provides the background for the projection screen. (You can change this later). - Load the Excel file containing the program's content.
Reviewing and sorting content:
After loading, a four-column table appears:
- Accompaniment: Notes and codes for orientation.
- E.g.:
REO(3)= Reformed Songs with Organ Accompaniment (3 verses). Zs(a1-5)= The Synod Sings (the entire song as one).Zs(1,3,5)= The Synod Sings (specific recorded verses).
- E.g.:
- E96: Numbers from the Transylvanian Hymnal (1996).
- MRE21: Numbers from the new Hungarian Reformed Hymnal (2021).
- Song's first line: The first line of the given song.
You can sort the display by any column by clicking on the header.
- Bold text: Where the song appears in bold letters, there is musical accompaniment (a referenced audio file in columns E, F, G of the Excel).
- Checkboxes: There is a checkbox in front of the song's first line. This is used to select the appropriate liturgical elements (songs, readings, announcements) before the service. The selected elements are moved to the top of the list in a block, so you no longer have to search for them during the service.
2. The Display Windows
Depending on the selected "Startup mode," either the Lite or Pro Display window opens. In both versions, the lyrics appear on a projection screen area, and below it, there are up to 3 audio player tracks. Only start one at a time!
The Display Lite Version
This is the simplest way to use the Liturgia System, providing a clean, streamlined display. Essentially, this is the window you need to share in Google Meet (or any other video conferencing program, such as Zoom, MS Teams, or Webex – although we will use Google Meet as the primary example in this manual, as after comparing services and prices, it proved to be the most ideal choice).
If you used to share your entire screen for broadcasts, from now on you only need to select this single window. Any lyrics or other content chosen from the Controller will be broadcasted to your online audience through this interface (along with the played musical accompaniment). It is important to note that you will continue to manage your own camera and microphone directly within your conferencing program as usual. Simultaneously, this content can also be sent locally to the congregation's projector (but we will discuss local projection a bit later).
Above the projection screen, you will find the following controls:
- Speed: You can change the playback speed by +/- 15%.
- Loop: (e.g., during gathering). It turns off automatically when the next song is selected.
- Opacity: Adjust the transparency of the background image.
- Font size (+/-) and FontLock: Adjust the font size, and use the FontLock checkbox to preserve this setting for subsequent songs.
The Display Pro Version (The "Mini OBS Studio")
The Pro window is much more complex. In fact, you must turn off both your camera and microphone in Google Meet, because this window acts as a mini OBS studio (similar to OBS Studio, the popular broadcasting software) and handles everything! You can build a complete "church interior" here.
Take a look at the PRO module! Build your own church interior using your custom images.
Additional features of the Pro version:
- Top controls (Scroll and Audio):
- Scroll: For automatically scrolling long texts (e.g., gathering info) that do not fit the screen. How to use it? Activate it with the checkbox. Use the slider to adjust the speed, and the two number boxes to set the wait times (in seconds) before starting and before repeating.
- Audio and Microphone settings (VU indicator): EC (Echo Canceling), NS (Noise Suppressant), and AGC (Auto Gain Control) switches. How to use them? When playing clean music from an external mixer, YOU MUST TURN THESE OFF, otherwise the system will distort the music. If you use only the laptop's microphone for speaking, it is recommended to turn on NS and EC.
- Bottom icon row and Layers:
- Change the Background image (from the
skinsfolder). - Turn the Pulpit and Screen on/off.
- Load the Camera (you must allow it in the browser on the first load). This icon also enables or disables the camera.
- Load the Mixer (audio source). (You must allow it in the browser on the first load). This icon also enables or disables the audio source. (There is a switch between the camera and the audio source that links the two sources to be toggled together).
- Save settings and Load settings.
- Change the Background image (from the
- Interactivity and Camera effects (Cutout):
- Essentially, you can stand "between" the background and the pulpit. Right-click the pulpit to change it, left-click to move and resize it. (You can also format the projection screen's text box by grabbing its corners).
- Right-click the camera feed to bring up effects. The most important is the cutout effect, which removes the camera's background and places only your portrait into the edited church interior.
skins folder)
The save button (6th button) is actually a "download" due to browser security rules! The saved .json settings file will go to your computer's Downloads folder. You must manually move this file into the skins folder under the Liturgia directory for future loading!
3. Screen Layout and Projection during the Service
Position the program so that the Controller and Display windows are comfortably visible to you.
- Online broadcasting (Google Meet): Share the TAB of the Display window in Meet, ensuring that the "Share audio" function is turned on!
- Local projector projection (projector icon): In the bottom right corner of both the Lite and Pro Display windows, you will find a small projector icon. Clicking this opens a raw, control-free window showing exclusively the projection screen's (text) content in perfect sync. You can drag this to the 2nd monitor (HDMI), or cast it wirelessly to the projector using ChromeCast. (Important: This window intentionally cannot be freely resized due to the synchronized content. Chromecast automatically fills the image; for HDMI, it's recommended to use the projector's zoom).
The answer is simple, though two-fold:
- If you were to share the main Display window with Chromecast or drag it directly to an HDMI projector, the operating system would automatically redirect ("steal") the audio to the external device. Because of this, the computer would go silent, local playback would stop, and no audio would go out to Google Meet either. The separate projection window is intentionally "mute" (contains no audio player). If you share this, the sound safely remains on the main Display window.
- Displaying the Controller's buttons and players on the local projection screen wouldn't be elegant for the congregation anyway.
4. The "Heart" of the Program: Editing the Excel File
The content backbone of the Liturgia System is the Excel spreadsheet located in the program's folder. This file is not a closed system; it is designed so you can freely edit and expand it according to the local congregation's needs.
The structure of the table (What goes where?):
The order of the 9 columns (A-I) is strictly fixed; the program looks for information based on this.
The files included in the downloaded base package currently use Hungarian names (e.g., _hirdetesek instead of _announcements, or textus.html instead of scripture.html). The English file names mentioned in this manual are direct translations to help you understand their purpose. You can easily rename the default files to English, or create new ones, as long as the exact file name is referenced correctly in Column H!
- Column (A) – Accompaniment / Note: This column is exclusively for your own orientation, it does not affect the operation of the program. You can enter whose recording it is and how many verses the audio file contains.
- Columns (B) and (C) – E96 and MRE21: Numbers from the 1996 Transylvanian and the 2021 new Hungarian Reformed Hymnal. Entering numbers helps with quick sorting by header in the Controller. (Not mandatory).
- Column (D) – Song's first line / Title: This is the most important identifier that appears in the Controller's list.
- Bold highlight: Where the program detects a playable audio file for the song, the Controller automatically highlights the title in bold letters.
- The underscore (_) trick: Rows starting with an underscore (e.g.,
_announcements,_scripture) are grouped together at the very top of the list during alphabetical sorting. This way, the permanent liturgical elements don't get mixed up with the songs.
- Columns (E, F, G) – Audio files (Player 1-3): This is where the exact names of the audio files to be played go, including their extensions (e.g.,
song01.mp3). Copy these files into themediafolder!- Supported audio formats:
.mp3,.wav,.ogg,.m4a. - If all three columns are filled for a song, 3 separate player tracks will appear next to each other in the Display window (e.g., 1 verse, 2 verses, full song).
- Supported audio formats:
- Column (H) – Custom background, Video, or HTML (External link): This is the smartest column of the system, which calls in files located in the
mediaorhtmlfolder.- Custom background image (
.jpg,.png,.webp): If an image name is entered here (e.g.,flag.jpg), this image overrides the global projector background set when the Controller started for the given song! This is an excellent solution for displaying a custom image like a national flag during the Anthem. - Video playback (
.mp4,.webm): If a video file is provided, the video appears instead of the text and can be started on the projector. - HTML files (e.g.,
scripture.html): Dynamically loaded external texts that change from week to week (see Chapter 5).
- Custom background image (
- Column (I) – The song lyrics: This is where the raw lyrics to be projected are found.
In the Excel cell, the entire song lyrics must appear as a strictly single continuous line! The use of traditional line breaks (Enter or Alt+Enter) is forbidden, as it breaks the table structure and causes the program to crash.
Verses and lines must be separated by the \n code, but you don't have to do this manually! We included the Mini-Editor utility exactly for this purpose (see Chapter 6). Simply paste your normally formatted song with line breaks into the editor, and with one click, it converts it into a copy/pasteable, Excel-friendly single line. Always use this method when adding new lyrics!
5. The Magic of External HTML Files (Scripture, Sermon...)
You can observe in the rows of the Excel that in column "H" there are file names such as scripture.html, sermon.html, or announcements.html.
These elements of the services change from week to week. It would be very error-prone to cram these long texts requiring formatting into tiny Excel cells every week. Instead, the program uses an elegant solution: it references external HTML files located in the html folder.
How does this work in practice?
- During your preparation for the Sunday service, you do not need to open Excel.
- Just open e.g. the
scripture.htmlfile with an editor (using the Mini-Editor is recommended), type or paste the appropriate text, format as needed, check the edited page by pressing Preview, and then save it.
(tip: from the abibliamindenkie.hu page it is very easy to paste both reading and scripture texts using the copy/paste method) - When you select e.g. the "_scripture" row in the Controller during the service, the program displays the content of the freshly edited "scripture.html" file referenced in column "H" on the Display screen!
This way, the liturgical framework (the Excel) remains stable, while you can edit the weekly changing contents lightning-fast before the service.
6. Instructions for Using the Mini-Editor
You can find the mini_editor.html file in the utilities folder. You do not need to start the Liturgia System to use it; you can open it in the browser by double-clicking. You can choose between two modes in the top bar:
MODE 1: "Text -> \n Converter" (For Songs)
You should use this mode when you want to add a new song to column "I" of the Excel.
- Simply paste the verses of the song with normal line breaks into the left text box.
- The single-line format padded with
\ntags is automatically generated in real-time in the right box. - By clicking the Copy to Clipboard button, you can paste the text into the Excel cell.
MODE 2: "HTML Editor" (Scripture, Sermon, Announcements)
This is for updating the weekly changing elements on Sundays.
Practical advice: Do not use Word or LibreOffice! These office programs pack the file with invisible "junk" codes, which cause a messy appearance on the display. Use the Mini-Editor's built-in visual editor instead!
- The left text box transforms into a visual text editor (like a mini Word).
- You have the option to use bold, italic, underlined formatting, right, left, center alignment, select font colors and types, and even insert tables and images. (It would be pointless to set the font size here, because the Liturgia program manages that itself).
- The program generates a clean, "junk-free" HTML code from this in the background in the right box.
The browser cannot directly overwrite the files on the computer. There are two methods:
- Method 1 (Copy / Paste - Fastest and recommended): Click the "Copy to Clipboard" button. Open the original file (e.g.,
html/announcements.html) with a default text editor (Notepad, TextEdit). Delete last week's content, paste the new one, and then save the file. - Method 2 (Download and Move): Click the "Save" button. The browser downloads the completed work to the Downloads folder. Rename the file and overwrite the old one with it in the Liturgia system's
htmlfolder.
7. The Technical Background: Why Google Meet and Local Server?
Why Google Meet?
For ensuring online participation, after a thorough consideration of options, Google Meet proved to be the most suitable platform. The use of YouTube, Livestream, and other open video sharing platforms presents obstacles for a smaller congregation because, among other things, playbacks substituting live instrumental accompaniment often fall victim to automatic copyright filtering algorithms. Even in the case of entirely royalty-free accompaniments, false identification is common, which can result in the immediate muting or blocking of the broadcast, and resolving this administratively on a weekly basis is disproportionately time-consuming. Google Meet is free from such filtering and, as a closed platform, protects the congregational intimacy of the service much more effectively.
Transmission of audio files (song accompaniments):
During development, solving the clear audio transmission of musical accompaniments was the main technical task. Since the built-in noise filters of conference programs focus on speech, they distort and filter out music. However, audio transmitted via sharing browser windows reaches the audience without distortion, in excellent quality. That is precisely why the Liturgia program was developed as a web-based application running in a browser. This technological decision not only solved the problem of audio quality but also ensures that the software can be used on any device and system.
Why localserver?
Although initially the goal was to operate the program online on a web server, this approach quickly ran into serious practical limitations. The smooth playback of large audio files and the flexible management of user settings required a local (offline) solution. However, many functions (for example, camera effects or the embedded display of HTML contents) require a server environment for security reasons, so a bridging technology was needed. These reasons led to the solution where the software operates as a local host in local server (localserver) mode, thus combining the advantages of web technologies with the stability of local data storage.
index.html file will start the program, it will not work properly because many elements of the program require localserver mode. Furthermore, the yellow warning line appearing at the top of the browser brings attention to this: "Warning: The program was opened directly from the computer (file mode). Due to browser security rules, loading media files may be restricted!" Always use the startup files below (found in Chapter 8)!
8. System Startup Guide
You will not need complicated settings to run the system. Depending on what kind of computer you use (Windows, Mac, Chromebook, or Linux), follow the few simple steps below.
(Tip: The Liturgia program is primarily optimized for the Google Chrome browser, or browsers belonging to this family. However, it also runs on Microsoft Edge. The executable files primarily look for the presence of these on the machine, so it's worth installing one of them.)
A) Usage on Windows
On Windows machines, usage is extremely simple, as the downloaded package already includes the standalone Python program (python\python.exe) necessary for the system to function. Thus, you do not need any further installation.
- Find the file named
start-win.batin the downloaded folder. - Double-click to start it.
- A black command prompt window will open, and the Liturgia System will automatically load in the browser.
- IMPORTANT: DO NOT CLOSE this black window until the end of the service, otherwise the system will shut down!
- When the service is over, you can stop the program by pressing CTRL + C in this black window. When "A LITURGIA RENDSZER LEALLT" appears on the screen, you can safely close the window.
B) Usage on Mac (macOS)
On Apple computers, the system starts using the start-mac-r1.command file and uses the machine's own built-in Python3 engine.
While older Apple systems included Python out of the box, Apple has removed it from newer versions. Therefore, for a newer operating system, you must install Python before first use. This only takes a few minutes:
- Visit the official python.org/downloads page.
- Download the latest Python 3 installer recommended for Mac.
- Start the downloaded file and walk through the installer as usual (Continue).
- Especially important step: At the very end of the installation, a folder will automatically open in the Finder. In this folder, locate a file named "Update Shell Profile.command" and one named "Install Certificates.command", and double-click on both! These will briefly open a black window and can then be closed. This step is critical for the Mac to recognize the Liturgia program in the future.
First Step: Making it executable (only the very first time):
After Python is successfully installed, only one security step remains. Due to Apple's strict protection, you must make the start-mac-r1.command startup file executable the first time.
- Open the Mac's built-in Terminal application.
- Type the following command into the Terminal, then put a space after it (do not press Enter yet!):
chmod +x - Using your mouse, simply drag the
start-mac-r1.commandfile into the Terminal window. (This will automatically type the exact file path after the space). - Pressing Enter makes the file executable. You can then close the Terminal.
Because the program is downloaded from the internet, your Mac's security system (Gatekeeper) will block it on the very first run. To easily bypass this:
- Instead of the usual double-click, for the very first time, right-click the
start-mac-r1.commandfile. - Select Open from the pop-up context menu.
- In the warning dialog that appears, you will now see an Open button. Click it to allow the execution.
Your Mac will remember this exception, so in the future, the program will start smoothly with a simple double-click.
Regular startup (before services):
- Double-click the
start-mac-r1.commandfile to start! - A Terminal window opens, followed by the controller in the browser.
- IMPORTANT: DO NOT CLOSE this Terminal window until the end of the service!
- To shut down, press CTRL + C in the Terminal window here as well.
C) Usage on Chromebook (Chrome OS)
The Liturgia System works perfectly on the Chrome OS operating system as well. However, you need to perform a few steps for this. The installation consists of four simple phases:
Phase 1: Turning on the "engine" (Installing Linux environment)
- Click on the clock in the bottom right corner of the screen, then on the Gear (Settings) icon.
- In the left menu, select the About ChromeOS button, then the Developers menu item.
- At the Linux development environment row, click the Turn on button next to it.
- In the pop-up window, click Next, then Install. (You can leave the settings at their default values).
- After the installation finishes, a black window will pop up (this is the Terminal). You can close this window for now.
Phase 2: Copying files and granting permissions
- Open the Chromebook's built-in Files application.
- Right-click on the downloaded folder named
Liturgiaand select Copy. - In the left pane, click on My files (the main directory!). Right-click in the empty area and select Paste.
- CRITICAL STEP: After copying is complete, right-click on the
Liturgiafolder itself, and from the pop-up menu, select the "Share with Linux" option. Without this, the engine running in the background cannot see the files!
Phase 3: Launching the automatic installer
- Open the Chromebook App Launcher (bottom left corner, "G" icon).
- Open the program named Terminal and click on the penguin head.
- Copy exactly (or type) the following command, paying attention to upper and lowercase letters, then press Enter. (this command will lead you to the working directory of Liturgia):
cd /mnt/chromeos/shared/MyFiles/Liturgia - To launch the actual installer, type the following command and press Enter:
bash install-chrome.sh
(The machine will then automatically download the required python3, python3-tk, lsof packages, generate a local server, and create the Liturgia launcher icon among the applications). - When
INSTALLATION COMPLETEappears on the screen, you can close the black window.
Phase 4: Final touch and regular startup
The Liturgia Server icon has appeared in the Linux apps folder. (Tip: Right-click and select "Pin to shelf").
- First, open the black Terminal application, then click on the penguin head.
- Wait those 2-3 seconds until the green "Ready" text and prompt appear in the black window. (This "wakes up" Linux). You can then immediately close this window.
- Following this, you can start the Liturgia Server icon located on the taskbar.
- In the pop-up folder selection window, navigate to the appropriate Liturgia folder (
/mnt/chromeos/shared/MyFiles/Liturgia) and click OK.
The system starts the server in the background and automatically opens the Controller in the browser. A window also runs in the background showing the localserver status. You have no further tasks with this, although after the event you can shut it down with the "Stop Server" button. (Warning: Due to many closings and reopenings, multiple Controller tabs may open. Make sure only one is open!)
D) Usage on Linux operating systems
No separate startup file was created for Linux systems, as Python is mostly already installed, and environments vary. To run, simply follow these two steps:
- Open a terminal in the main folder of the Liturgia program (where the
index.htmlfile is located), and start the built-in local server with the following command:
python3 -m http.server 8000 - Open a Chromium-based browser (e.g., Google Chrome), and type into the address bar:
http://localhost:8000
Letöltés és Fizetési Koncepció
A weboldalról letölthető Liturgia szoftver négy konstrukcióban érhető el:
- Alap (Free) verzió: Egy többszörösen tesztelt, stabilan működő, teljes értékű alapprogram. Ez a verzió ingyenesen letölthető és szabadon használható, de nem tartalmazza a Pro modult, és nem járnak hozzá jövőbeli fejlesztési frissítések. Ha tetszik a program, lentebb egy kávé árával támogathatod a fejlesztést!
- Pro Verzió vásárlása (50 CAD): Megkapod a professzionális kamerakezelést és effekteket nyújtó Pro modult, de jövőbeli szoftverfrissítések (programkövetés) nélkül.
- 1 éves Regisztráció (50 CAD): Megkapsz minden programkövetési és fejlesztési frissítést a fizetéstől számított egy éven keresztül (a Pro modult ez a csomag nem tartalmazza).
- PRO Promóció (100 CAD): A legjobb ajánlat! Regisztrálj 2 év teljes körű programkövetést és frissítést, és megkapod a Pro modult ajándékba (150 CAD érték 100 CAD-ért).
Mit takar a frissítés és a tartalom?
Részletes információkat a szoftverkövetés, a médiafájlok kezeléséről és a felhasználási feltételekről a Jogi Nyilatkozat (EULA) fülön találsz.
Download & Pricing Concept
The Liturgia software downloadable from the website is available in four structures:
- Basic (Free) Version: A multiply tested, stable, full-fledged base program. This version is free to download and use, but it does not include the Pro module and comes with no future development updates. If you like the program, you can support its development for the price of a coffee below!
- Purchase Pro Version (50 CAD): You get the Pro module providing professional camera management and effects, but without future software updates (software tracking).
- 1-Year Registration (50 CAD): You receive all tracking and development updates for one year from payment (this package does not include the Pro module).
- PRO Promotion (100 CAD): The best offer! Register for 2 years of comprehensive software tracking and updates, and get the Pro module as a gift! (150 CAD value for 100 CAD).
What do updates and content cover?
For detailed information about software tracking, media files handling, and terms of use, please refer to the Legal (EULA) tab.
Regisztráció és Fizetés Registration and Payment
Médiatár
Építsd fel a saját kíséretgyűjteményedet! Hogy megspóroljuk a keresgéléssel töltött időt, ezen a külső oldalon egy hasznos linkgyűjteményt állítottunk össze más szerzők és gyülekezetek által online elérhetővé tett énekkíséretekhez. A Kézikönyv útmutatása alapján (4. pont) az onnan beszerzett fájlokat egyszerűen beépíthetsz a programodba. Felhívjuk a figyelmet, hogy a harmadik féltől származó linkekről letöltött anyagok felhasználása minden esetben a te saját felelősséged.
Tovább a linkgyűjteményhez ↗Jogi Nyilatkozat és Felhasználási Feltételek
1. Szerzői Jogok és Szellemi Tulajdon
A Liturgia Rendszer teljes architektúrája, a vezérlőlogika, a HTML/JavaScript kódok és a beépített Mini-Editor a szerző kizárólagos szellemi terméke, melynek fejlesztése mesterséges intelligencia (AI) közreműködésével valósult meg. Minden jog fenntartva.
2. Ingyenes Használat (Lite verzió)
A szoftver alapverziója (a Vezérlő és a Display-Lite megjelenítő) ingyenesen letölthető és szabadon használható gyülekezeti, valamint istentiszteleti célokra.
3. Módosítás és Terjesztés Tilalma
A szoftver kódjának, belső logikájának és működésének bárminemű módosítása, átdolgozása vagy visszafejtése szigorúan tilos. A program beszerzése kizárólag a hivatalos weboldalon keresztül engedélyezett; a fájlok és telepítőcsomagok engedély nélküli újraosztása vagy harmadik fél általi publikálása nem megengedett. A professzionális (Display-Pro) megjelenítő modul nem része az ingyenes alapcsomagnak, annak jogosulatlan másolása és használata tilos.
4. Nyílt Forráskódú (Open-Source) Modulok
A rendszer bizonyos speciális technikai funkciói – különös tekintettel a valós idejű kamera effektek feldolgozására és az Excel-formátumú adatbázisok beolvasására – harmadik féltől származó, nyílt forráskódú modulokra épülnek. Ezen kiegészítők a saját eredeti licencfeltételeik tiszteletben tartásával kerültek beépítésre.
5. Programkövetés és Frissítések
Az ingyenesen letölthető verzióhoz nem biztosított automatikus szoftverfrissítés és hibajavítás. A programkövetés, a technikai támogatás (support) és a szoftver legújabb verzióinak elérése kizárólag a hivatalos weboldalon elérhető két fizetős opció (1 éves regisztráció vagy PRO Promóció) valamelyikének megvásárlásával vehető igénybe.
6. Szerzői jogok és Médiafájlok
A Liturgia Rendszer telepítőcsomagja nem tartalmaz harmadik fél által jogvédett tartalmakat. A programhoz mellékelt zenei kíséretek és hanganyagok a szerző és közreműködőinek saját feljátszásai, amelyek szabadon felhasználhatók a gyülekezeti alkalmakon. A szoftver nyitott kialakítású: a Kézikönyv 4. pontja alapján a saját Excel-fájl szerkesztésével bárki felépítheti a saját kíséretgyűjteményét. A weboldalunkról elérhető Médiatár csupán egy harmadik felekhez vezető linkgyűjtemény, amely a keresést hivatott megkönnyíteni. Fontos hangsúlyozni, hogy az egyénileg a rendszerbe betöltött, külső forrásból – akár a Médiatár linkjein keresztül – beszerzett tartalmak (zenék, képek) jogtisztaságáért és felhasználásáért kizárólag a szoftvert üzemeltető végfelhasználó felel.
7. Vásárlási és Visszatérítési Feltételek
A rendszer kanadai székhellyel (Calgary, Alberta) üzemel. Mivel a regisztrációval egy digitális terméket (szoftvermodult/licencet) kapsz, minden vásárlás végleges. Kivételes esetben (pl. téves utalás, többszörös terhelés) történő visszatérítés (refund) esetén a tranzakciós (PayPal) és adminisztrációs költségek a vásárlót terhelik, és ezek levonásra kerülnek a visszautalt összegből.
8. Adatvédelmi Tájékoztató (Privacy Policy)
A fizetés során megadott személyes adatokat (Regisztrációs név és Kapcsolattartási E-mail cím) kizárólag a szoftverlicenc nyilvántartására és a szoftverfrissítések megküldésére használjuk. Ezeket az adatokat biztonságosan tároljuk, és harmadik félnek nem adjuk ki. A tranzakció pénzügyi adatait a PayPal kezeli saját adatvédelmi irányelvei szerint.
9. Felelősségkizárás (Warranty Disclaimer)
A Liturgia Rendszert a szerző „ahogy van” (as is) és „ahogy elérhető” (as available) alapon biztosítja, mindenféle kifejezett vagy vélelmezett garancia nélkül. Bár a szoftver fejlesztése és tesztelése a legnagyobb gondossággal történt, a szerző nem garantálja a program hibamentes és megszakítás nélküli működését. A szoftver használatából, a technikai leállásokból, operációs rendszer frissítésekből vagy harmadik fél szolgáltatásaiból (pl. Google Meet, hálózati kapcsolat) eredő közvetlen, közvetett, vagyoni vagy nem vagyoni károkért, illetve elmaradt haszonért a szerző semmilyen felelősséget nem vállal. A programot mindenki kizárólag a saját felelősségére használja.
Legal Disclaimer and Terms of Use
1. Copyright and Intellectual Property
The entire architecture of the Liturgia System, the control logic, HTML/JavaScript codes, and the built-in Mini-Editor are the exclusive intellectual property of the author, developed with the assistance of artificial intelligence (AI). All rights reserved.
2. Free Use (Lite Version)
The basic version of the software (the Control Panel and the Display-Lite viewer) can be downloaded for free and used freely for congregational and worship purposes.
3. Prohibition of Modification and Distribution
Any modification, alteration, or reverse engineering of the software's code, internal logic, and operation is strictly prohibited. Acquiring the program is only permitted through the official website; unauthorized redistribution or third-party publication of files and installation packages is not allowed. The professional (Display-Pro) viewer module is not part of the free basic package; its unauthorized copying and use are prohibited.
4. Open-Source Modules
Certain special technical functions of the system – particularly the processing of real-time camera effects and the reading of Excel-format databases – are built on third-party, open-source modules. These add-ons were integrated respecting their own original license terms.
5. Software Tracking and Updates
Automatic software updates and bug fixes are not provided for the free downloadable version. Software tracking, technical support, and access to the latest versions of the software are exclusively available through our two paid options (1-year registration or PRO Promotion) on the official website.
6. Copyright and Media Files
The Liturgia System installation package does not contain any third-party copyrighted materials. The musical accompaniments and audio files included with the program are the author's and contributors' own recordings, which can be freely used during church services. The software is open by design: based on Section 4 of the Manual, anyone can build their own accompaniment collection by editing their Excel file. The Media Library (Médiatár) accessible from the Hungarian version of our website is merely a collection of third-party links intended to facilitate searching. It is important to emphasize that the end user operating the software is solely responsible for the copyright clearance and use of any content (music, pictures) obtained from external sources – including through the Media Library links – and individually loaded into the system.
7. Terms of Sale and Refund Policy
The system operates from a Canadian headquarters (Calgary, Alberta). Since you receive a digital product (software module/license) upon registration, all sales are final. In exceptional cases (e.g., accidental duplicate payment), PayPal and administrative fees will be deducted from any refunded amount.
8. Privacy Policy
The personal data provided during payment (Registration Name and Contact E-mail) is used exclusively for software license registration and sending software updates. This data is stored securely and will not be shared with third parties. The financial data of the transaction is handled by PayPal according to its own privacy policy.
9. Disclaimer of Warranties and Limitation of Liability
The Liturgia System is provided by the author on an "AS IS" and "AS AVAILABLE" basis, without warranties of any kind, either express or implied. Although the software has been developed and tested with the utmost care, the author does not warrant that the program will operate uninterrupted or be error-free. The author assumes no liability for any direct, indirect, incidental, or consequential damages, loss of data, or service interruptions arising from the use or inability to use the software, technical downtimes, operating system updates, or third-party services (e.g., Google Meet, network connectivity). Use of the software is entirely at your own risk.